Inspired lately by the wave of before and after photos with aesthetically pleasing, ultra organized kitchen pantries? If you’re wondering how to organize a pantry from start to finish, check out these genius pantry organizing ideas that I’ve learned from the pro’s!
In my work in the luxury estate management industry, I’ve gotten firsthand knowledge from some of the best professional organizers. It’s a mesmerizing process, and looking at a finished project makes me feel so zen!
I’ve even taken a masterclass from the pro’s on how to organize your pantry from start to finish, and how to maintain a pantry. These are my favorite tips and tricks I’ve learned from professional organizers for a pantry that is functional as well as eye candy!
This guide will show you step by step how to organize your pantry, including editing inventory, categorizing items, and a buying guide, to show which organizers to use with what products. I’ll also go over a few key tricks to keeping your space in prime condition in between shopping trips.
Fans of the tidying phenomenons like Marie Kondo’s Art of Tidying Up, or the Netflix sensation TV series The Home Edit? You’ll be ready to put that inspiration into action with these pro tips!
Step 1: Prepare Your Pantry
Before you start it’s a good idea to prepare yourself for the task at hand. That means measuring your pantry shelves to see what size organizers and containers will fit there, and gauge what supplies you’ll need to have on hand.
Most professional organizers will do a “walk through” to assess the size of the pantry and see what types of storage items are needed. Next, they will order the right storage containers, organizers , and labels so that they’re all ready to go on the day of the pantry makeover.
It’s up to you if you want to shop for these containers before or after you start the organizing process, but it’s a lot less headache if you already have your “product” to use the industry lingo. When you’re ready to shop, check out the buying guide in step #4 to help choose your perfect pantry organization supplies.
So why do you need to use storage containers in your kitchen pantry anyway? Using these organizers helps you not only see your items more clearly, but they help you see how much inventory can comfortably fit there. This will help you make sure you don’t over purchase, and you are always using what you have in stock!
I also recommend having cleaning supplies to clean your shelves and a notepad to jot down anything important that comes to mind about items to purchase or things to remember as you give your pantry a makeover!
When you’re ready to shop for pantry storage and organizers, check out the Buying Guide in Step #4. It will help you decide which types of products are right for your pantry
Step 2 : Take Everything Out The Pantry
I know it’s probably going to look like a small explosive went off in your kitchen, but step one is a key part to creating an organized pantry.
Make sure you have lots of counter space free, and start to unload your pantry onto a surface where you can look at all your items.
Go ahead and try to start grouping similar items together like canned goods, snack items, drinks etc. so that you can see how much of each “category” you currently have on hand.
Step 3: Edit All Of Your Pantry Inventory
Now is the time to toss anything expired, empty, or that you won’t use in the future.
That oddball spice you bought for a recipe you made 3 years ago and hated? Time to let go of that sucker.
A good rule of thumb is that if an item doesn’t don’t have sell by date, toss it between 6-12 months after purchase.
As you toss items that you use, but have gone bad- be sure to add to them to your shopping list for next time.
Step 4: Make Your Pantry Organizing Procedure Plan & Categories
When you go about brainstorming how to organize your pantry, the first thing you need to keep in mind, is who is using this space the most?
Are you an at home chef that loves to cook? Think about how to keep all your oils and spices, at an arm’s reach. Do you have tiny kiddos at home? Make sure you keep their favorite treats at their eye level, so they won’t have to go hunting at snack time.
From there, decide on your categories. You can get creative and create your own, but some great basic ideas that you may want to start with are:
- Breakfast
- Baking
- Cereal
- Chips
- Kids
- Grains
- Nuts
- Pasta
- Crackers
- Cookies
- Cooking
- Snacks
- Sweets
- Treats
- Dinner
- Dried Fruit
- Rice
- Sauces
- Spices
- Canned Goods
Step 5: Get Your Pantry Storage Containers & Labels Ready
Once you’ve got a game plan for how you are grouping your items together, it’s time to contain them in an organizer or storage container.
I also highly recommend adding a label so you can find items more easily and reuse the space for the same items consistently .
It’s important when shopping for containers and labels to choose products that are similar in style for a streamlined look.
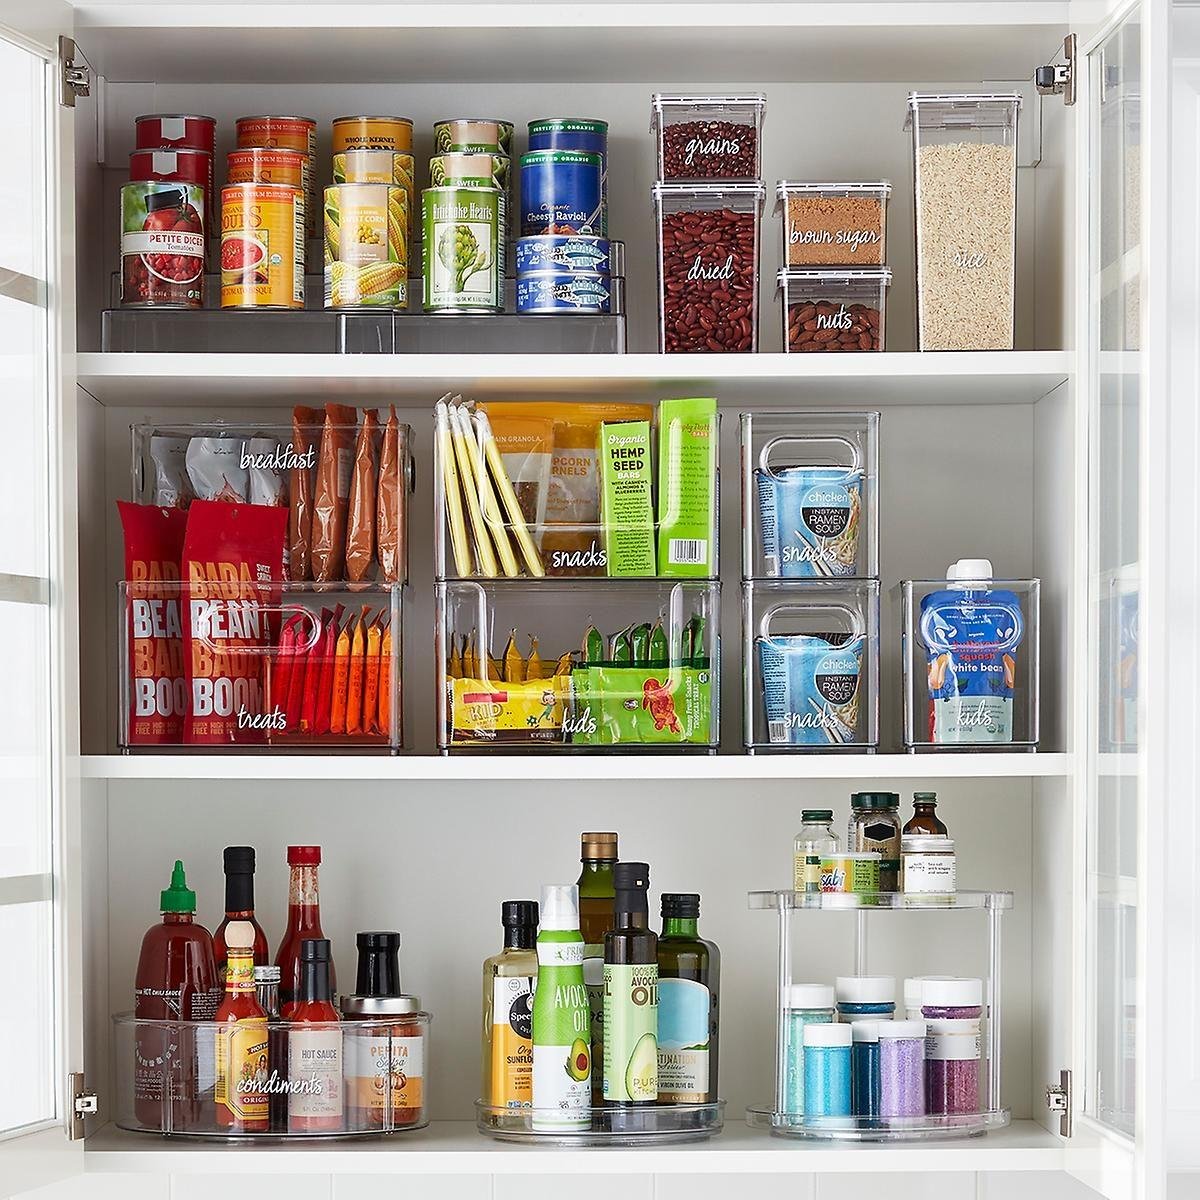
Clear and see-through organizers are my favorite to use in pantries, because they allow you to see what is inside more easily, and know exactly how much you have.
If you are not sure how many you will need, it’s always a good idea to buy one or two extras which you can return if you don’t need. (Or find an extra spot for them somewhere like a bathroom closet!)
Here are some of the most popular types of storage containers and organizers to use in the pantry, and which items they work best with:
Pantry Organizer & Storage Container Buying Guide:
Canisters
- Clear canisters with airtight lids are great for items like cereals, grains, nuts and other snacks.
- Avoid “pop button” seal canisters because they are less durable and get damaged easily over time. Instead look for canisters with clasps made of durable plastic or metal with an airtight seal. They’re easier to clean and will stand up to long term use.
Containers and storage bins
- Clear containers and storage bins are ideal for individually wrapped snacks, boxed items, baking supplies, and treats. Stackable bins will also help you use up all of the real estate on your shelves.
- For items for items that you want to keep better hidden, like bags of snacks or back stock items, colored plastic or wicker style baskets are a great choice. Just be sure that you choose a quality material that doesn’t shed or you’ll end up with a headache.
Tiered Shelves
- Sturdy tiered shelves are perfect for similarly sized items in jars and cans so that you can see the all the labels clearly.
- Smaller tiered shelves are also great for spices and seasonings.
Turntables & Lazy Susans
- Whether you call it a turntables or a lazy susan, these spinning storage containers make it a breeze to find what you need. They are best used for items like condiments, oils, sauces, and supplements.
- Turntables with dividers are also great for grab and go items like cereal bars and kids snacks.
Drink organizers
- Metal and plastic drink organizers make canned and bottled drinks more organizer in the pantry. Try front loading metal organizers for canned waters and sodas, especially if you don’t want to have to restock often!
Metal Storage Bins
- For pantry staples like potatoes, onions metal bins are your best bet. The open wiring allow the items to breathe better than closed containers, so they stay fresh longer.
- If you are lacking space on your shelves, free standing and rolling stackable wire baskets for your pantry can be the perfect solution for pantries with floor space.
Pantry Labels
- Consistency is key with labels so that all of your items have a uniform look. My favorites are clear labels with white or black script. If you think you will be changing labels often, invest in supplies to print your own on stickers at home.
- Chalkboard labels are another way to give you more freedom and flexibility with labeling your items! Just be sure to write neatly!
Step 6. Get To Organizing Your Pantry!
Now you are finally ready to get your pantry organized!
When readying your pantry to put your items back in, it’s best to test your storage container first to see where it fits best, and then load it with your pantry inventory.
When organizing, it’s helpful to use your shelves to help make sense of where you will place items. For example heavy items like drinks, or easy to reach snacks for kids are great for bottom shelves.
Things you use often like everyday snacks and cooking supplies are ideal to have at eye level. Finally less frequently used inventory like paper products, and surplus inventory are perfect to keep on the upper shelves.
The final step is to label each of your containers to correspond to the items.
Voila! Now stand back and admire all your hard work, creating a functional and beautiful pantry that will make you look forward to using your kitchen!
Just don’t be surprised when your friends ask you if they can take a peek, and they ask you for your advice on how to organize a pantry!
Advice for keeping your pantry organized
Here are some key tips for making sure your pantry always looks as amazing as the day you organized it!
- Keep plastic storage containers looking new, with a magic eraser or natural glass cleaners. Don’t use abrasive sponges that will scratch the finish. This will help them look as great as the day your bought them!
- Keep a small inventory of kitchen paper items like paper towels or plastic cups in your pantry, but keep larger supplies out of the way in a storage closet. This will free up more space for things you use more often.
- Add a shopping list inside your pantry. Whether it’s a simple notepad, or a wall mounted dry erase board, it will help you to remember an item as soon as you are running out of it.
- A small sachet of lavender will help keep pantry pests like silverfish and moths away from your food.
- If you’ve got shelves very close to the floor where you don’t want to place food items, it’s a great space to place rarely used appliances.
- A small step stool is a great idea for pantries that have tall shelves, so you can always reach what you need.
Thanks so much for reading this guide on how to organize a pantry! I hope these tips from professional organizers will help you to create a zen space that makes you look forward to spending time in your kitchen.
And if you are looking for more ways to see give your kitchen a makeover, look check out another way to bring style and function with these Luxury Kitchen Decor Ideas To Steal From High End Homes.
Check out the latest posts from flourishmentary




Share Your Thoughts